Authorization
Authentication Overview
Aprimo supports OAuth 2.0 with the following flows:
- Authorization Code with PKCE: Interactive web authorization.
- Client Credentials Flow: Authorize a service as a specified user.
- Resource Owner Password Flow: Users authorize with their Aprimo username and token.
These OAuth 2.0 tokens are used across the Productivity Management REST API, DAM REST API, Upload Service, Reporting API, Analytics API, and all other Aprimo APIs.
To use an OAuth 2.0 token, include it in the {Authorization: Bearer [token]} header for these APIs.
Tokens have a 5-minute clock skew to prevent validity issues.
- Client Credentials: Use for API calls as a service user, with no need for changes.
- If your purpose is to learn the Aprimo REST API, this is the recommended flow.
- Resource Owner Password: Use for multiple users when a browser login flow is not possible.
- Authorization Code with PKCE: Use for individual user authorization with a browser-based login flow to get access and refresh tokens.
If you receive a 401 error with a null response, your token likely expired. Use the refreshToken to get a new one.
OAuth 2.0 - Scopes
Available Scopes:
api: Access to the REST API.reporting-api: Access to the Reporting API.offline_access: Obtain a refresh token via the authorization code flow.filestore-access: Download attachments and digital assets.
Scopes should be space-separated, e.g., {"scope": "api offline_access" }.
filestore-accessThe filestore-acces scope only applies to Aprimo Productivity Management. Downloading content from Aprimo DAM is included in the api scope and is handled by user permissions.
Integration Registrations
To get an access token, register an Aprimo Client in Administration > Integration > Registrations. During registration, you'll need to make the following decisions:
- Client Name: Name of the client registration.
- Description: Purpose of the registration.
- Client Secret: A secret that cannot be changed; store securely.
- Redirect URL: Required if using the Authorization Code flow.
- OAuth Flow Type
- Authorization Code (PKCE): Recommended for interactive auth flows.
- Client Credentials: Use for service-based API calls.
- Resource Owner Password: Use for multiple users without a browser-based login.
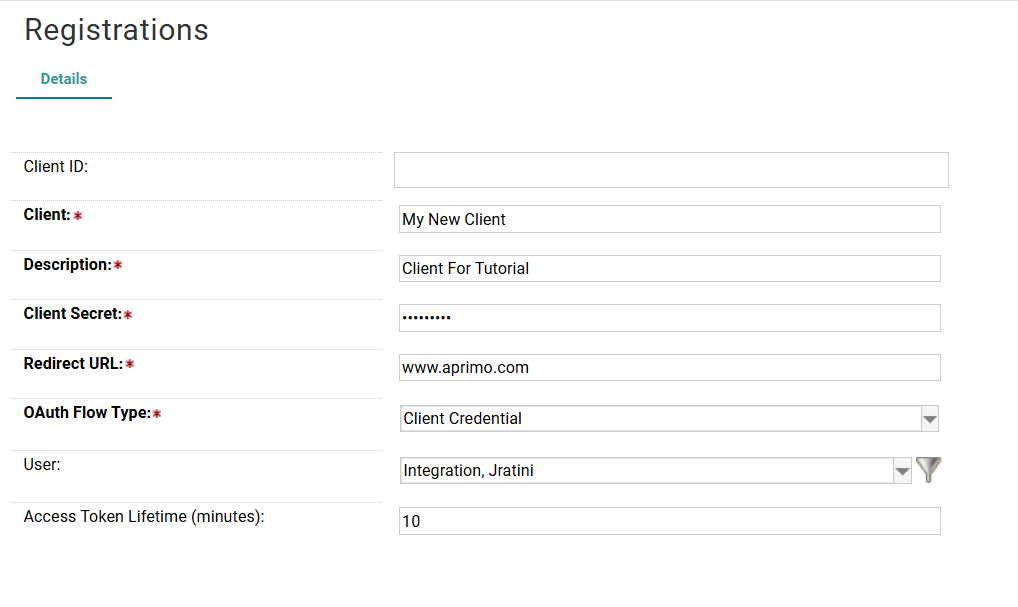
Integration registration requires Security or System Administration domain rights.
OAuth 2.0 Flow - Client Credentials
The Client Credentials flow retrieves an API token for backend service calls. The token is used in the context of the user specified during integration registration.
Step 1: Register the Client Application
In Productivity Management, go to Administration > Integration > Registrations.
- Click New and set the OAuth Flow Type to Client Credentials.
- Set the User field to the user on behalf of whom calls will be made (this is the only user for this registration).
- Store the Client Secret securely, as it cannot be retrieved later.
- Set the Access Token Lifetime (1 to 60 minutes).
- Click Save. Note: Registrations may take up to 15 minutes to update.
Step 2: Retrieve an Access Token
Make an HTTP POST request to the login/connect/token endpoint and include authorization parameters in the request body.
curl --location 'https://[aprimoEnvironment].aprimo.com/login/connect/token' \
--header 'Content-Type: application/x-www-form-urlencoded' \
--data-urlencode 'grant_type=client_credentials' \
--data-urlencode 'scope=api' \
--data-urlencode 'client_id=[clientid]' \
--data-urlencode 'client_secret=[clientsecret]'
OAuth 2.0 Flow - Resource Owner Password
Step 1: Register the Client Application
In Productivty Management, go to Administration > Integration > Registrations.
- Click New and set the OAuth Flow Type to Resource Owner Password.
- Set the Access Token Lifetime (1 to 60 minutes).
- Store the Client Secret securely, as it cannot be retrieved later.
- Click Save. Note: Registrations may take up to 15 minutes to update.
Step 2: Retrieve an Access Token
Make an HTTP POST request to the login/connect/token endpoint and include authorization parameters in the request body.
The UserToken attribute is not the user's password, but their Aprimo unique user token. Retrieve a user token by navigating to My Profile > 3-Dot Menu > User Token.
curl --location 'https://[aprimoEnvironment].aprimo.com/login/connect/token' \
--header 'Content-Type: application/x-www-form-urlencoded' \
--data-urlencode 'grant_type=password' \
--data-urlencode 'username=[Username]' \
--data-urlencode 'password=[UserToken]' \
--data-urlencode 'scope=api' \
--data-urlencode 'client_id=[clientid]' \
--data-urlencode 'client_secret=[clientsecret]'
The Resource Owner Password flow does not return a refresh_token. If the returned access_token expires a new one must be requested.
OAuth 2.0 Flow - Authorization Code with PKCE
The Authorization Code with PKCE flow enables user-level mapping between your app and Aprimo via an interactive web login. To receive a refresh token, check Enable Refresh Token when registering your integration.
For more details on PKCE, refer to this blog post and RFC7636. To request an access token, you must generate a code verifier (a random string of 43-128 characters using specific characters) and create a code challenge (Base64-URL-encoded SHA256 hash of the verifier).
Step 1: Register the Client Application
In Productivty Management, go to Administration > Integration > Registrations.
- Click New and set the OAuth Flow Type to Authorization Code with PKCE.
- Store the Client Secret securely as it cannot be retrieved later.
- Optionally, enable the refresh token and set its life (60 minutes to 10 days).
- Click Save. Note: Changes may take up to 15 minutes to take effect.
Step 2: Prompt the User To Login to Aprimo
Make a HTTP GET request to the login/connect/authorize endpoint:
https://[aprimoEnvironment].aprimo.com/login/connect/authorize?
response_type=code
&state=[yourState]
&client_id=[yourClientId]
&redirect_uri=[yourRedirectURI]
&scope=[yourScopes]
&code_challenge=[yourCodeChallenge]
&code_challenge_method=S256
Set state to a value you store on your end to validate on the callback to your redirect uri.
Your redirect URI must match the redirect URI supplied in the integration registration exactly.
Note that the scope parameter will not be returned in the callback URL.
https://[aprimoDomain].aprimo.com/login/connect/authorize?response_type=code&state=1234560&client_id=ABCD-EFG1&redirect_uri=https://www.aprimo.com&scope=api&code_challenge=123456qwertyy789&code_challenge_method=S256
Step 3: Retrieve an Access Token
After user authorization (via Aprimo login or SSO), your redirect URI will be called with the following parameters:
https://your_redirect_uri?code=[onetimeuseCode]&scope=[yourScope]&state=[yourState]
Use the state value to match the flow to your application.
Next, make this HTTP POST request to the login/connect/token endpoint:
curl --location 'https://[aprimoEnvironment].aprimo.com/login/connect/token' \
--header 'Content-Type: application/x-www-form-urlencoded' \
--data-urlencode 'grant_type=authorization_code' \
--data-urlencode 'code=[code]' \
--data-urlencode 'redirect_uri=[redirect_uri]' \
--data-urlencode 'code_verifier=[code_verifier]' \
--data-urlencode 'client_id=[client_id]' \
--data-urlencode 'client_secret=[client_secret]'
You will receive an access token and optionally a refresh token.
OAuth 2.0 - Getting an Access Token with a Refresh Token
Use your refresh token to obtain a new access token.
Make an HTTP POST request to:
https://[aprimoEnvironment].aprimo.com/login/connect/token
Authorization: Basic [base64encodedYourClientId:YourClientSecret]
Content-Type: application/x-www-form-urlencoded

grant_type=refresh_token
&refresh_token=[yourRefreshToken]
This will return a new access token, a new refresh token, and invalidate the previous refresh token.
Integration API - Access Domain Right
The Integration API - Access domain right only applies to REST API calls made to Aprimo Productivity Management.
When using the REST API, you can only access records the authenticated user has permissions for. For security, users with System Administration, Access rights cannot read or edit any record via the API, unlike in the UI. Integrations using a service user shouldn’t require system admin access.
To limit REST API access without adding the service user to every record's access list, we’ve introduced the Integration API, Access domain right. With this right, a user can access records without being on the access list, but they still need the appropriate domain right (e.g., Activity, View). For example, a user with both Integration API, Access and Activity, View rights can view all activity records in Aprimo, even if they’re not on each record's access list.
Without the Integration API, Access right, the user must be on the access list to view records via the API. This domain right allows service-style integrations to bypass the access list requirement.
Resources with Access Lists:
- Activities
- Programs
- Funding Accounts
- Markets
- Plans
- Offers