DAM - Getting Started
DAM Developer Tutorial
In this tutorial, we'll guide you through the fundamental steps of interacting with the Aprimo Digital Asset Management (DAM) API. This straightforward approach is designed to help you quickly integrate with the API and perform essential operations such as authorization, searching for assets, downloading assets, retrieving metadata, uploading files, and creating new assets.
You are encouraged to follow along using our provided DAM Developer Tutorial POSTMAN Collection.
Before you begin developing, read about Aprimo Rate Limiting.
Authorization
Before you can interact with the Aprimo DAM API, you need to authenticate your application. Aprimo uses OAuth 2.0 for authorization, which involved the following steps:
- Registering a Client Registration
- Requesting an Access Token
- Including the Access Token in an
AuthorizationHeader
Registering a Client Registration
- Within your Aprimo environment, navigate to the Administration view
- Top left 3 stack menu > Administration
- Find the Integration section and select Registration
- In the top right, click New
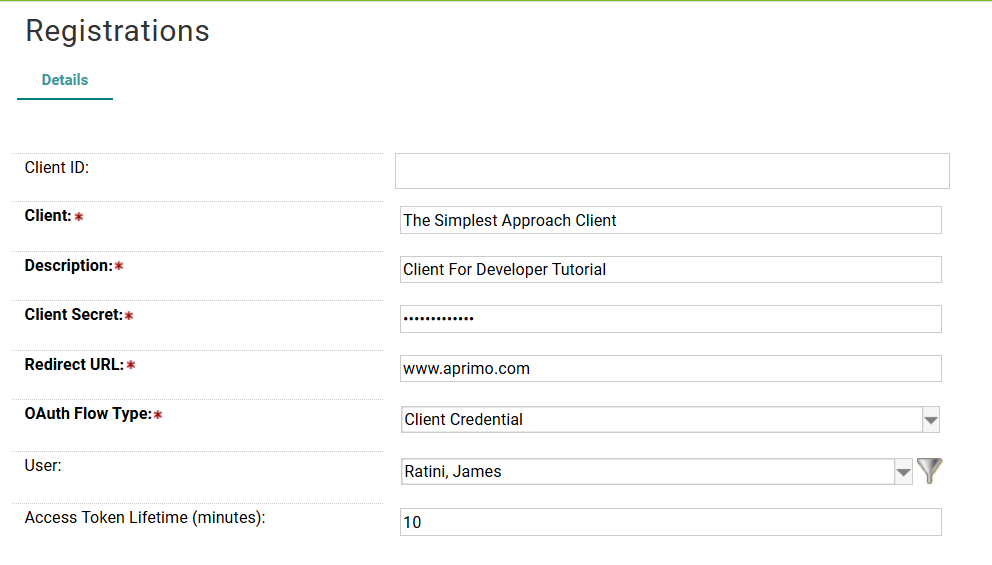
- Fill out the client registration form
- Client - The Name of the new Client Registration.
- Description - The description of the new Client Registration.
- Client Secret - The secret of the Client Registration. Do not share this. Treat it as a secure password.
- Redirect URL - Set this to www.aprimo.com. It won't be used in our chosen Auth flow.
- OAuth Flow Type - Set this to Client Credentials. Aprimo also supports Resource Owner Password and Authorization Code with PKCE, but Client Credentials is our recommended flow for learning.
- User - Set the user to your current admin user.
- Access Token Lifetime - Leave as 10.
- Click Save in the top right.
Requesting an Access Token
Requesting an access token involves using the credentials of your Client Registration and making an HTTP POST request to the Aprimo Authorization endpoint.
Make an HTTP POST request to https://<tenant>.aprimo.com/login/connect/token and pass in the below parameters as URL Encoded values.
If you're following along in our DAM Developer Tutorial POSTMAN collection you can set the environment variables to your Client's values
curl --location 'https://<tenant>.aprimo.com/login/connect/token' \
--header 'Content-Type: application/x-www-form-urlencoded' \
--data-urlencode 'grant_type=client_credentials' \
--data-urlencode 'scope=api' \
--data-urlencode 'client_id={ClientID}' \
--data-urlencode 'client_secret={ClientSecret}'
This tutorial limits the authorization scope to api, if you would like to learn what other scopes we support, navigate to our Authorization page.
Making this request will return an access token in the response body. We will use this access token to make the rest of our requests by adding it as a header. {Authorization: Bearer <access_token>}
To learn more about Aprimo's authorization, read our Authorization article.
Searching For Assets
Most of the time you don’t want to perform an action on the complete set of objects in Aprimo DAM, but only on a specific subset or an individual one. This means that you have to create a specific collection of objects before you can start processing them, and the easiest way to do this is by searching.
After you have obtained an access token you will want to find assets in the Aprimo DAM that you can use for your use case. To do this, we will use the Aprimo DAM's record search endpoint.
Make an HTTP POST request to https://<tenant>.dam.aprimo.com/api/core/search/records
curl --location 'https://<tenant>.dam.aprimo.com/api/core/search/records' \
--header 'Authorization: Bearer <access_token>' \
--header 'API-VERSION: 1' \
--header 'Content-Type: application/json' \
--header 'Accept: application/json' \
--data '{
	"searchExpression":
	{
		"expression": "Title CONTAINS '\''cat'\''"
	},
	"logRequest": true
}'
The search expression used in this example request is very simple for demonstration purposes. There are also a variety of more attributes that can be used in a searchExpression that are important to understand to fully make use of the Aprimo DAM search endpoint. If you'd like to learn more about Aprimo's searching capabilities please check out our Searching article.
For the next steps of this tutorial, you will need a record id, choose and save one from the search results. The record id will be stored in the id property of the returned json.
{
    "facets": [],
    "truncatedFacets": [],
    "page": 1,
    "pageSize": 50,
    "totalCount": 1,
    "items": [
        {
      ----> "id": "3722e72cb1644a6a9430ae6001108338", <-----
            "fields": null,
            "files": null,
            "preview": null,
            "thumbnail": null,
            "masterFile": null,
            "masterFileLatestVersion": null,
            "classifications": null,
            "accessLists": null,
            "status": "Released",
            "contentType": "Record",
            "title": null,
            "tag": null,
            "textContent": null,
            "permissions": null,
            "locks": null,
            "aiInfluenced": "No",
            "analyticsData": null,
            "hasImageOverlay": false,
            "modifiedOn": "2022-04-27T20:54:50.39Z",
            "modifiedBy": null,
            "createdOn": "2022-03-22T16:32:11.277Z",
            "createdBy": null
        }
    ]
}
Get Asset Metadata and Files
For this request you will need the record ID you gathered during the Search For Assets section.
After you search for assets in Aprimo DAM you may wish to get further metadata from those assets. A record, or asset, in Aprimo contains only necessary information by default. Metadata such as fields and files are considered related objects that need to be requested during the HTTP Request using an Aprimo select header.
A select header can be used to obtain related objects when making a request to most endpoints that return objects in Aprimo. A full select header looks like {select-record: fields, files}. Where the base resource, record, is specified in the header name and the requested related objects are specified in a command seperated list in the header value.
Select headers are a core concept of Aprimo DAM and most integrations that consume content from the Aprimo DAM will make use of them. To learn more about them check out our Select Headers article. To see more examples of them you can check out our Get Single Record request in our POSTMAN API Reference
We will use this select-header method to get the metadata fields from the record we found when searching.
curl --location --globoff 'https://<tenant>.dam.aprimo.com/api/core/record/{{recordID}}' \
--header 'Accept: application/json' \
--header 'Authorization: Bearer <access_token>' \
--header 'API-VERSION: 1' \
--header 'select-record: fields, files'
You can see in the above cURL example we include the header {select-record: fields, files}; this will causes the Aprimo DAM REST API to return the metadata fields of the record and the different files that exist on the record.
Explore the fields and files attributes in the response from Aprimo to see how Aprimo stores metadata and files.
Getting metadata from a record in Aprimo is a core concept used by most downstream integrations and it is an important request to understand!
Downloading An Asset
For this request you will need the record ID you gathered during the Searching For Assets section. We will be using that record ID to make an order request to Aprimo. Our order will return a Download URL for the record's MasterFileLatestVersion, that being the most recent version of the current master file; which is the most common file people will work with.
Using your record ID and access_token make the following request
curl --location 'https://<tenant>.dam.aprimo.com/api/core/orders' \
--header 'Authorization: Bearer <access_token>' \
--header 'accept: application/json' \
--header 'content-type: application/json' \
--header 'API-VERSION: 1' \
--data '{
	"type":"download",
	"targets":[
		{
			"recordId": "<recordID>",
			"targetTypes":["Document"],
			"assetType": "LatestVersionOfMasterFile"
		}
	]
}'
Lets break this request down. Looking at the request body we can see we set the type attribute to download, meaning we will get back a download URL. Looking at our targets list, we specify the recordId we want to download, and then targetTypes and assetType specify what we want to download from that record. In this case, Document means we want the primary file stored on the record, instead of something like the thumbnail, or preview. The assetType attribute, LatestVersionOfMasterFile specifies we want the most recent version of our MasterFile.
The returned response body will look like this:
{
    "notificationThresholdInSeconds": null,
    "useCDN": "Automatic",
    "disableProcessing": "No",
    "orderType": "download",
    "deliveredFiles": [
        "<file_download_url>"
    ],
    "totalFileSize": 402893,
    "targets": null,
    "creatorEmail": "<creator_email>",
    "disableNotification": false,
    "earliestStartDate": null,
    "executionTime": "00:00:00.0762152",
    "id": "<order_id>",
    "type": "DownloadOrder",
    "priority": 0,
    "startedOn": "2024-12-13T17:36:49.8848062Z",
    "status": "Success",
    "message": "",
    "failedTargetsCount": 0,
    "createdOn": "2024-12-13T17:36:49.7282903Z",
    "createdBy": null
}
If you open the file_download_url in the deliveredFiles attribute in your browser you will begin to download the file.
Uploading a File to Aprimo
Uploading files to Aprimo is often a core part of many integrations. If an integration isn't consuming content from Aprimo DAM, then it is most likely adding content. This section will cover the process of uploading a file to Aprimo, in the next section we'll look at using that uploaded file to create a new record in Aprimo.
The Aprimo Upload Service supports chunked upload of files. If a filesize is greater than 20MB it will need to be chunked into segments less than 20MB, each segment uploaded, and then the Aprimo Upload Service will stitch the segments back together.
Upload a File less than 20MB
Find a file to upload that is less than 20MB.
Make the following HTTP POST request. You can find this request in our DAM Developer Tutorial POSTMAN Collection.
curl --location 'https://<tenant>.aprimo.com/uploads' \
--header 'Authorization: Bearer <access_token>' \
--header 'Content-Type: multipart/form-data' \
--header 'Cookie: ARRAffinity=6...; ARRAffinitySameSite=...' \
--form 'file="<your_file>"'
The HTTP Response from Aprimo will contain a JSON attribute named token. This is your uploadToken. Even though your file now exists within Aprimo, it isn't associated to any Aprimo record so we still have one step left.
Upload a File larger than 20MB
When a file is larger than 20MB it can't be uploaded in a single request. Instead, the file must be split into segments smaller than 20MB and uploaded using the Aprimo segmented upload flow. The Aprimo Upload Service will then re-assemble the segments back into a single file once all segments have been uploaded.
The segmented upload flow consists of the following steps:
- Prepare the file segments
- Set up the upload
- Upload each segment
- Commit the upload
You can also cancel an in-progress upload at any point after it has been set up.
1. Prepare the file segments
Splitting the file into segments is the responsibility of the client and depends on the technology your integration is written in. Each segment must be smaller than 20MB, and you should keep track of how many segments you create as you'll need the total count when committing the upload.
2. Set up the upload
This step notifies the Aprimo Upload Service that a segmented upload is being initiated.
curl --location 'https://<tenant>.aprimo.com/uploads/segments' \
--header 'Authorization: Bearer <access_token>' \
--header 'API-VERSION: 1' \
--header 'Content-Type: application/json' \
--data '{
    "filename": "<your_file>"
}'
When successful, the response will have HTTP status 200 OK and contain a uri and a token. The uri is used to upload the file segments in the next step.
{
    "uri": "/uploads/segments/NzVmMDY5YTA4MGU1NDBhMDkyY2FmYzQ3YzQwMzNjMmQ%3d",
    "token": "NzVmMDY5YTA4MGU1NDBhMDkyY2FmYzQ3YzQwMzNjMmQ="
}
3. Upload each segment
Each segment of the file is uploaded to the uri returned in the previous step. The client specifies the index of the segment being uploaded as a query string parameter.
The segment index is zero based. There must be one segment with index=0 and there should be no gaps between indexes.
curl --location 'https://<tenant>.aprimo.com/uploads/segments/NzVmMDY5YTA4MGU1NDBhMDkyY2FmYzQ3YzQwMzNjMmQ%3d?index=0' \
--header 'Authorization: Bearer <access_token>' \
--header 'API-VERSION: 1' \
--header 'Content-Type: multipart/form-data' \
--form 'segment0=@"<path_to_segment>"'
The name of the file provided in the upload form is not important. Repeat this step for every segment of the file, incrementing the index each time. It is possible to upload different segments in parallel requests.
When successful, the response will have HTTP status 202 Accepted.
4. Commit the upload
After all segments have been uploaded, commit the upload flow. The client provides the total number of segments uploaded and the name of the original file.
curl --location 'https://<tenant>.aprimo.com/uploads/segments/NzVmMDY5YTA4MGU1NDBhMDkyY2FmYzQ3YzQwMzNjMmQ%3d/commit' \
--header 'Authorization: Bearer <access_token>' \
--header 'API-VERSION: 1' \
--header 'Content-Type: application/json' \
--data '{
    "filename": "<your_file>",
    "segmentcount": "4"
}'
During this step Aprimo validates that all segments are present, then re-assembles the file and persists it on the server.
When successful, the response will have HTTP status 200 OK and contain a token and a sasUrl. The token is your uploadToken — the same kind of token returned when uploading a file smaller than 20MB — and can be used in the Creating a New Record step below. The sasUrl provides direct access to the uploaded file.
{
    "token": "eyJQGXRoIjoicWE1LXJjLzg4NDZqZTZiZDY4MzQxZjY4YjI5NWE5ZWFkZGE0MmZmL21pa2UucG5nIiwiVm9sdW1lSWQiOzI0OTA2MmFiZC1mYmYxLTgwMTYtYTMwYS1iYjdkYWQ2ODM4YzIifQ==",
    "sasUrl": "https://[blobstoragename].blob.core.windows.net/[customer specific container]/8846be6bd68341f68b295a9eadda42ff/photo.png?sv=2024-11-04&st=2026-01-22T11%3A08%3A00Z&se=2026-01-23T11%3A23%3A00Z&sr=b&sp=rwl&sig=gk6sZCYl0cBffPKNhyWJCdmhVWC2vfKeIyZDu21yGlU%3D"
}
Cancel a segmented upload
A segmented upload can be cancelled at any moment after it has been set up.
curl --location --request DELETE 'https://<tenant>.aprimo.com/uploads/segments/NzVmMDY5YTA4MGU1NDBhMDkyY2FmYzQ3YzQwMzNjMmQ%3d' \
--header 'Authorization: Bearer <access_token>' \
--header 'API-VERSION: 1'
When successful, the response will have HTTP status 204 No Content.
An uploadToken can only be used once. Once used, the uploadToken will no longer be recognized by the Aprimo system.
Creating a New Record
For this request you will need an access_token and an uploadToken.
Now that your file has been uploaded into Aprimo, you will likely want to associate that new file to an Aprimo record. You could add the file to an existing record, but for this tutorial we are going to create a brand new record for the file.
To create a new record make the following HTTP POST request:
curl --location 'https://<tenant>.dam.aprimo.com/api/core/records' \
--header 'Authorization: Bearer <access_token>' \
--header 'API-VERSION: 1' \
--header 'Content-Type: application/json' \
--data '{
    "classifications": {
        "addOrUpdate": [
            {

                "id": "<classificationID>"
            }
        ]
    },
    "files": {
        "master":"<upload_token>",
        "addOrUpdate": [
            {
                "versions": {
                    "addOrUpdate": [
                        {
                            "id":

                            "<upload_token>",
                            "fileName": "<filename>",
                            "versionLabel": "optional",
                            "comment": "optional"
                        }
                    ]
                }
            }
        ]
    }
}'
Lets break down this request body, there are a few things happening here.
First lets look at the classification attribute of our request body. Records in Aprimo can't exist without being associated to at least one classification. You should have access to your Aprimo tenant's classifications to find a classificationID to use here. Or take a look at our POSTMAN Examples to find a request to pull all classifications and get a classificationID like that.
"classifications": {
        "addOrUpdate": [
            {

                "id": "<classificationID>"
            }
        ]
    }
Second we have the files attribute where we are defining the files on the new record. We specify the master file will be created using our newly uploaded file by using the upload_token. Then, within the addOrUpdate attribute we create a new version of our masterfile using the same upload_token, which will result in the current version of our file being the file we just uploaded.
"files": {
        "master":"<upload_token>",
        "addOrUpdate": [
            {
                "versions": {
                    "addOrUpdate": [
                        {
                            "id":"<upload_token>",
                            "fileName": "<filename>",
                            "versionLabel": "optional",
                            "comment": "optional"
                        }
                    ]
                }
            }
        ]
    }
Once you receive your HTTP Response from Aprimo, the response body will contain a recordID. Use that recordID in your Get Record request, or navigate to that recordID in the Aprimo DAM UI to view your new record!